
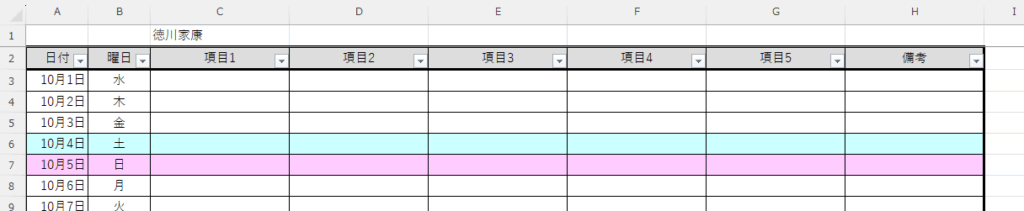
一人一人の予定表(複数月)を作成します。
イメージは下図のようになります。
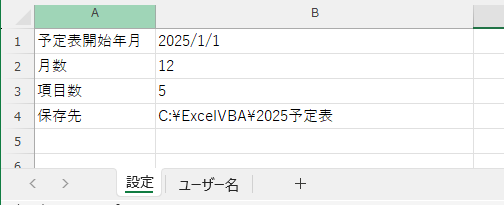
パラメータを設定できるようにしておきます。シート名を「設定」とします。
「予定表開始年月」は指定した年月から開始します。日は影響しません。
「月数」は、12ヶ月分のシートを作成します。
「項目数」は、C列から項目を作成する数になります。
「保存先」は、ユーザー名ごとにファイルを作成するので、ファイルの保存先になります。
保存先が作成されていない場合は、フォルダが作成されます。
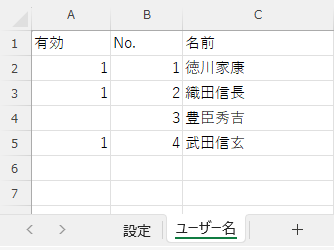
複数のユーザーを作成できるようにします。シート名を「ユーザー名」とします。
A列に有効なユーザー(1を設定)かを設定し、有効なユーザーのみ作成します。
B列を空欄にすると、そこまでのユーザーのみ作成します。
【出力結果】
ユーザー単位のファイルを作成します。

【プログラム】
' ------------------------------------------------------------
' 説明:予定表を作成
' ------------------------------------------------------------
Sub CreateCalender()

    Dim ws_setting As Worksheet
    Dim ws_username As Worksheet

    Dim start_month As Date
    Dim month_num As Long
    Dim dayofweek As Boolean
    Dim item_num As Long
    Dim save_dir As String

    Dim NewWb As Workbook
    Dim NewWs As Worksheet

    Dim idx1 As Long
    Dim idx2 As Long
    Dim target_date As Date

    Dim last_row As Long
    Dim overwrite As Long


    ' 0=上書きしない, 1=上書きする
    overwrite = 0


    ' 設定のワークシートを取得
    Set ws_setting = ThisWorkbook.Sheets("設定")

    start_month = ws_setting.Range("B1")    ' 予定表開始年月
    month_num = ws_setting.Range("B2")      ' 月数
    item_num = ws_setting.Range("B3")       ' 項目数
    save_dir = ws_setting.Range("B4")       ' 保存先


    ' 保存先のフォルダを作成
    CreateSubFolder save_dir


    ' ユーザー名のワークシートを取得
    Set ws_username = ThisWorkbook.Sheets("ユーザー名")

    ' 2列目の "No." から最終行を取得する
    last_row = GetBlankRow(ws_username, 1, 2)

    ' タイトル行を除いて2行目から確認する
    For idx1 = 2 To last_row

        If ws_username.Cells(idx1, 1) = 1 Then

            ' Bookを作成
            Set NewWb = Workbooks.Add
            ' Sheetを取得
            Set NewWs = NewWb.Sheets(1)


            ' シートごとに作成
            For idx2 = 0 To month_num - 1

                ' 月の算出(0=指定月,1=次月,1=次々月, ...)
                target_date = Format(DateAdd("m", idx2, start_month), "yyyy/mm/dd")

                ' 予定表の作成
                CreateCalenderSheet NewWb, idx2, target_date, item_num, ws_username.Cells(idx1, 3)

            Next idx2

            ' 初月のシートを選択する
            NewWb.Sheets(1).Select

            If overwrite = 0 Then
                ' 上書き保存しない場合(001のファイルが作成される)
                NewWb.SaveAs FilenameAddNumber(save_dir & "\" & ws_username.Cells(idx1, 3) & ".xlsx")
            Else
                ' 上書き保存する場合
                ' 警告メッセージを非表示
                Application.DisplayAlerts = False
                NewWb.SaveAs save_dir & "\" & ws_username.Cells(idx1, 3) & ".xlsx"
                ' 警告メッセージを非表示
                Application.DisplayAlerts = True
            End If

            NewWb.Close

        End If

    Next idx1

    ' お知らせ
    MsgBox "完了"

End Sub
' ------------------------------------------------------------
' 説明:予定表を作成(シート)
' 引数:1:処理対象のワークブック
' 2:シート番号 1から
' 3:指定の年月
' 4:項目数(横に増えていく)
' 5:ユーザー名
' 戻値:空白までの最終行数
' ------------------------------------------------------------
Sub CreateCalenderSheet(wb As Workbook, sheet_number As Long, target_date As Date, item_num As Long, Optional username As String = "")
Dim ws As Worksheet
Dim idx1 As Long
Dim idx2 As Long
Dim lastday As Long
Dim y_offset As Long
Dim st_column As String
Dim en_column As String
' シートが1目つの時は、1つ目のシートを使う
If sheet_number = 0 Then
Set ws = wb.Sheets(1)
Else
Set ws = wb.Worksheets.Add(After:=Worksheets(wb.Sheets.Count))
End If
' シート名の設定
ws.Name = Format(target_date, "yyyy-mm")
' 先頭行に名前を入れる場合
If username <> "" Then
' C列に名前をセット
y_offset = y_offset + 1
ws.Cells(y_offset, 3) = username
End If
' タイトルの開始行をセットする
y_offset = y_offset + 1
' タイトルをセット
idx2 = 1
ws.Cells(y_offset, idx2) = "日付"
idx2 = idx2 + 1
ws.Cells(y_offset, idx2) = "曜日"
idx2 = idx2 + 1
' 項目の先頭(左)
st_column = ColumnIdxToStr(idx2)
' 項目のセット
For idx1 = 1 To item_num
ws.Cells(y_offset, idx2) = "項目" & idx1
idx2 = idx2 + 1
Next idx1
' 備考をセット(右端)
ws.Cells(y_offset, idx2) = "備考"
' 項目の末尾
en_column = ColumnIdxToStr(idx2)
' 月末の日を取得する(1月=31,2月=28 or 29, ...)
lastday = Day(DateSerial(Year(target_date), Month(target_date) + 1, 0))
' データはタイトルの次の行
y_offset = y_offset + 1
For idx1 = 0 To lastday - 1
DoEvents
If idx1 = 0 Then
' 月初め (1日)
ws.Cells(y_offset, 1) = target_date
Else
' 2日以降
ws.Cells(y_offset + idx1, 1).Formula = "=" & Replace(ws.Cells(y_offset + idx1, 1).Offset(-1, 0).Address, "$", "") & "+1"
End If
' 月日に変更
ws.Cells(y_offset + idx1, 1).NumberFormatLocal = "m""月""d""日"";@"
' 曜日を設定
ws.Cells(y_offset + idx1, 2) = Format(ws.Cells(y_offset + idx1, 1), "aaa")
' 曜日を中央揃え
ws.Cells(y_offset + idx1, 2).HorizontalAlignment = xlCenter
If Weekday(ws.Cells(y_offset + idx1, 1)) = vbSunday Then
' 日曜日は背景色をピンクにする
ws.Range("A" & y_offset + idx1 & ":" & en_column & y_offset + idx1).Interior.Color = RGB(255, 204, 255)
ElseIf Weekday(ws.Cells(y_offset + idx1, 1)) = vbSaturday Then
' 土曜日は背景色を水色にする
ws.Range("A" & y_offset + idx1 & ":" & en_column & y_offset + idx1).Interior.Color = RGB(204, 255, 255)
End If
Next idx1
' 先頭行を固定
FreezePanes ws
' フィルタを設定
ws.Range("A" & y_offset).AutoFilter
' タイトル行の背景色変更、中央揃え(1日をy_offsetにしているため -1 する
With ws.Range("A" & y_offset - 1 & ":" & en_column & y_offset - 1)
.Interior.Color = RGB(221, 221, 221)
.HorizontalAlignment = xlCenter
End With
' 項目の幅をまず自動で幅セット
ws.Columns("A:" & st_column).AutoFit
' 項目の幅を設定
ws.Columns(st_column & ":" & en_column).ColumnWidth = 20
' 罫線を引く
With ws.Range("A" & y_offset - 1 & ":" & en_column & y_offset + lastday - 1)
' 格子
.Borders(xlInsideVertical).LineStyle = xlContinuous
.Borders(xlInsideHorizontal).LineStyle = xlContinuous
' 太枠(外)
.Borders(xlEdgeLeft).Weight = xlThick
.Borders(xlEdgeTop).Weight = xlThick
.Borders(xlEdgeBottom).Weight = xlThick
.Borders(xlEdgeRight).Weight = xlThick
.Borders(xlEdgeLeft).LineStyle = xlContinuous
.Borders(xlEdgeTop).LineStyle = xlContinuous
.Borders(xlEdgeBottom).LineStyle = xlContinuous
.Borders(xlEdgeRight).LineStyle = xlContinuous
End With
' 罫線を引く(タイトル)
With ws.Range("A" & y_offset - 1 & ":" & en_column & y_offset - 1)
' 太枠(外)
.Borders(xlEdgeLeft).Weight = xlThick
.Borders(xlEdgeTop).Weight = xlThick
.Borders(xlEdgeBottom).Weight = xlThick
.Borders(xlEdgeRight).Weight = xlThick
.Borders(xlEdgeLeft).LineStyle = xlContinuous
.Borders(xlEdgeTop).LineStyle = xlContinuous
.Borders(xlEdgeBottom).LineStyle = xlContinuous
.Borders(xlEdgeRight).LineStyle = xlContinuous
End With
' 印刷時の設定を行う
With ws.PageSetup
' 余白の設定
.LeftMargin = Application.InchesToPoints(0.25)
.RightMargin = Application.InchesToPoints(0.25)
.TopMargin = Application.InchesToPoints(0.3)
.BottomMargin = Application.InchesToPoints(0.3)
.HeaderMargin = Application.InchesToPoints(0.3)
.FooterMargin = Application.InchesToPoints(0.3)
' 横向き印刷
.Orientation = xlLandscape
' シートを1ページに印刷
.Zoom = False
.FitToPagesWide = 1
.FitToPagesTall = 1
End With
' 最後は選択を解除して A1 を選択した状態にする
ws.Cells(1, 1).Select
End Sub【補足】
GetBlankRow 関数は、最終行(Row)取得(空白まで) を参照してください。
FreezePanes 関数は、ウインドウ枠の固定(先頭行) を参照してください。
ColumnIdxToStr 関数は、列名と列番号の変換 を参照してください。
FilenameAddNumber 関数は、ナンバリングしたファイル名を作成する を参照してください。
CreateSubFolder 関数は、サブフォルダまで一括作成 を参照してください。

コメント